


At your event, guests are snapping photos, laughing in groups, and showing off dance moves. But by the end of the night, those memories are scattered across dozens of phones, chats, and social media feeds, never quite coming together into a single, shared story.
That disconnect keeps many hosts from capturing the full magic of their event. The usual tools, such as photo drop platforms or wedding photo apps, often require sign-ups, charge fees, or have clunky interfaces that guests don’t want to deal with.
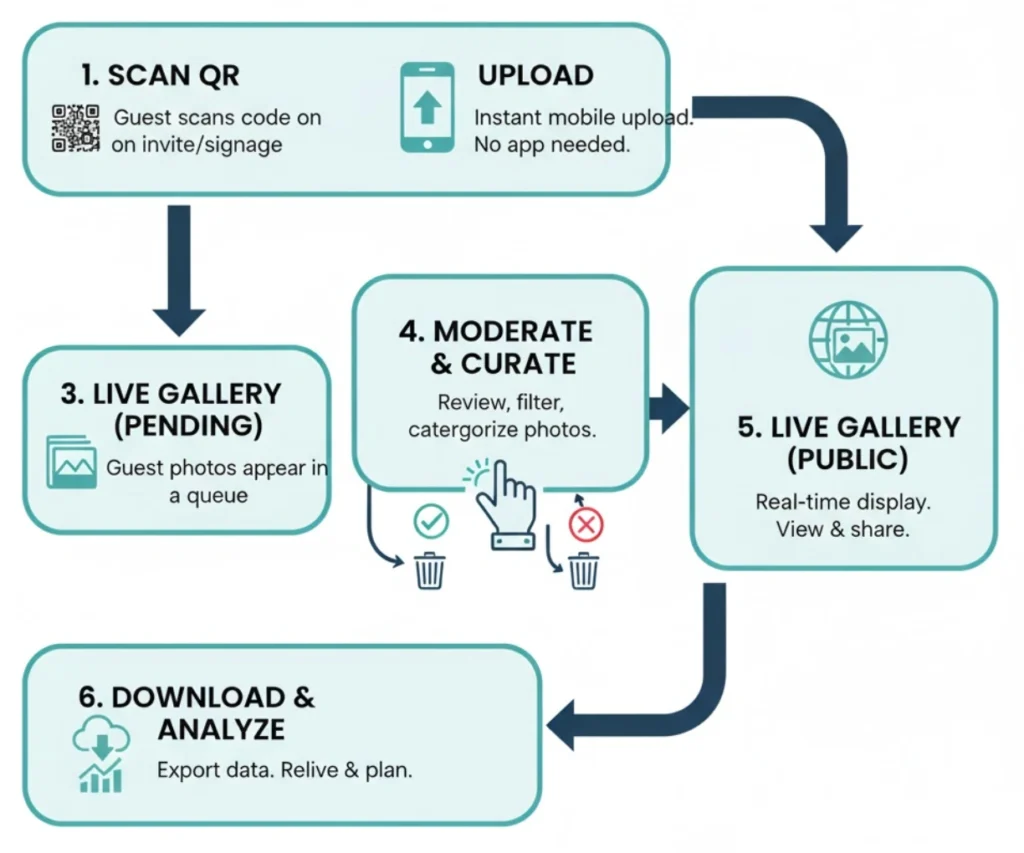
But what if guests could instantly upload photos in real time with a simple scan of a QR Code? You could watch a live gallery fill up as the event unfolds, moderate uploads if needed, and share a complete photo gallery afterward.
In this guide, you’ll learn how to set up a completely free QR Code-based photo-sharing system, from your invitations to live photo walls, so every picture your guests take becomes part of one unforgettable, shared memory.
Table of contents
- Challenges of sharing event photos without QR Codes
- How QR Codes make event photo sharing effortless
- How to build a QR Code photo sharing system
- Best practices for creating QR Codes to share event photos
- What insights help you improve QR Code photo sharing at future events?
- Set your event apart with QR Code photo shares
- Frequently asked questions
Challenges of sharing event photos without QR Codes
Collecting guest photos after an event might seem simple, but anyone who has hosted a large gathering, whether a corporate conference, networking mixer, concert, or wedding, knows it can be one of the most chaotic parts of post-event coordination.
And that’s only the beginning. The challenge goes beyond simple forgetfulness. Here’s what really makes it difficult:
1. Manual photo collection limits guest engagement
When you ask guests to share photos after the event, participation is often low and inconsistent. Research notes 76% of event photos promised via email never actually get sent to the host.
Most people forget, feel too busy afterward, or don’t see the point once the event is over. Without an easy, immediate way to contribute, only a small portion of guests will take the time to upload their photos. As a result, many great moments stay locked away on personal phones instead of becoming part of your shared event memories.
2. Complicated upload steps discourage guest contributions
If guests need to download an app, create an account, or jump through hoops just to upload their photos, you lose most of them right away. Requiring multiple steps or platforms can cause a sharp drop-off in participation rates, as most people won’t put in the extra effort unless it’s extremely simple.
3. Sharing photos days later kills the excitement
Timing matters. Waiting days or weeks to collect and share photos means you’ve already missed the peak of post-event excitement. The likelihood of collecting guest photos drops by approximately 35% for each week that passes after the celebration. After that, asking guests to find the best shots and upload them becomes a low priority. By the time photos start trickling in, the event’s energy, buzz, and emotional connection have faded.
4. Scattered photos make event memories incomplete
Even when guests do share their photos, the lack of a central hub means your event ends up like a jigsaw puzzle with missing pieces. Photos may live in WhatsApp groups, Instagram stories, private folders, and personal phones.
Without centralization, you risk only capturing photos from a handful of guests, missing moments from many others. The result: instead of a cohesive photo collection that reflects the full spectrum of your event’s energy, you get isolated snapshots—still valuable, but incomplete. A centralized system enhances story completeness and facilitates the ease of sharing all memories afterward.
How QR Codes make event photo sharing effortless
Typically, collecting event photos is a slow and tedious process. People forget to upload or lose the link later. With QR Codes, it happens instantly. Guests scan, upload, and see their photos appear in a shared gallery in real time.
With QR Codes, you remove all friction: guests don’t need to download apps, remember links, or wait until later. You can turn every interaction into a contribution, transform idle moments into opportunities for engagement, and even make sharing a little competitive or fun. Here are some of the benefits of using QR Codes to share your event photos:
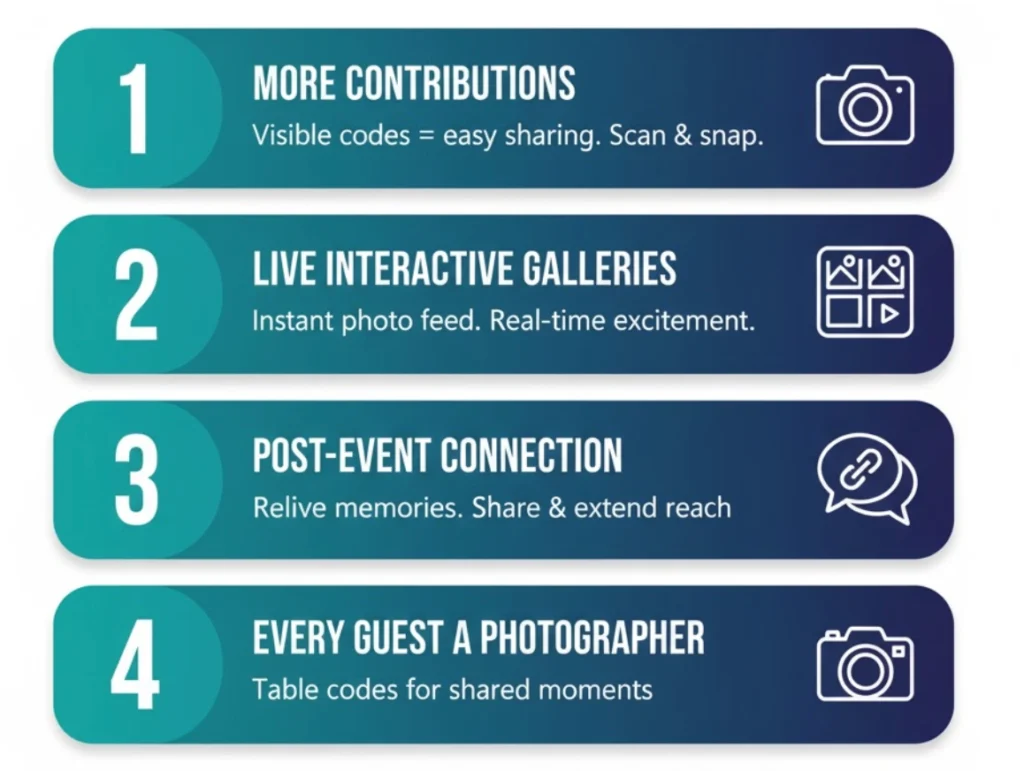
1. Getting more guest contributions with visible QR Codes
When you visibly display a QR Code at registration, on tables, or near key sessions, you encourage more guests to act right away. The simplicity of “scan-and-upload” removes the barrier of remembering a URL or retrieving an invitation email.
When QR Codes are accessible throughout the venue, you create more opportunities for photos to be shared in the moment, while guests are still energized and engaged.
2. Live galleries make events more interactive
A live photo gallery that updates in real time, powered by guest uploads through QR Codes, instantly brings your event to life. Guests can see their photos within seconds, turning them from passive attendees into active participants.
At large events and conferences, a QR Code setup has been shown to increase the average time people spend at booths or displays by nearly four minutes. Guests seeing their own photos (and others’) creates excitement, friendly competition, and a sense of belonging.
3. Keep the conversation going with post-event galleries
QR Codes that link to post-event photo or video galleries motivate guests to relive and share their experiences, extending your event’s social reach.
Engagement stays high when follow-up messages include QR Codes to highlight reels, photo galleries, or feedback forms. This makes it easy for guests to revisit memories, share feedback, and keep your event top of mind.
4. Turn every guest into a photographer
Placing QR Codes on event tables or programs, whether at conferences, parties, or ceremonies, instantly invites guests to join the storytelling. You don’t have to rely solely on the official photographer; guests can scan a simple code and share their own candid shots.
With no apps to download or forms to fill out, the process feels effortless and fun. It also builds community, as everyone contributes to a shared gallery that captures the celebration from multiple perspectives.
How to build a QR Code photo sharing system
On the event day, everything should just work and let you focus on enjoying the moment instead of troubleshooting uploads. Therefore, go through the process in advance, anticipating potential issues, and test it across various devices and connectivity scenarios.
Here’s how you can make the experience effortless for guests:
Step 1: Define your event photo goals
Before diving into setup, take a minute to clarify what kind of photo-sharing experience you want.
Do you want a guest-only upload link where people can contribute photos privately? Or a public gallery that auto-updates in real time during your event?
Maybe you’d like to moderate uploads before they appear live on the screen. The right choice depends on the type of your event. Weddings and conferences often benefit from moderated feeds, while casual gatherings work fine with open collaboration.
Once you know your setup, you’ll know exactly how to configure permissions and signage later.
Step 2: Create your shared album in Google Photos
Now let’s create the foundation of your photo-sharing system: the shared album.
- Go to Google Photos on your desktop or open the mobile app.
- Select some existing photos or videos you want to include, maybe pre-event shots, decor setup images, or invitations.
- Tap the “+” icon → Album → Create New Album.
- Give it a clear title like “Our Wedding Day” or “Annual Summit 2025.”
- Click Share to generate a link. You can send this directly to guests via email, text, or WhatsApp.
Guests who have the Google Photos app will be taken straight to the album; others can view it in their browser, no login needed.
Step 3: Allow guests to contribute
By default, your album is view-only. To let guests add their photos, you’ll need to enable collaboration.
- Open your album, tap the three-dot menu, and select Options → Collaborate.
- Toggle on “Let others add their photos.”
- Share the album link again. This version now lets guests upload directly from their phone galleries or cameras.
You can also continue adding your photos at any time by selecting “Add to album.” Keep in mind that Google Photos has a 20,000-photo limit per album, which is plenty for most events, but it is worth noting this point if you are planning larger conferences or multi-day functions.
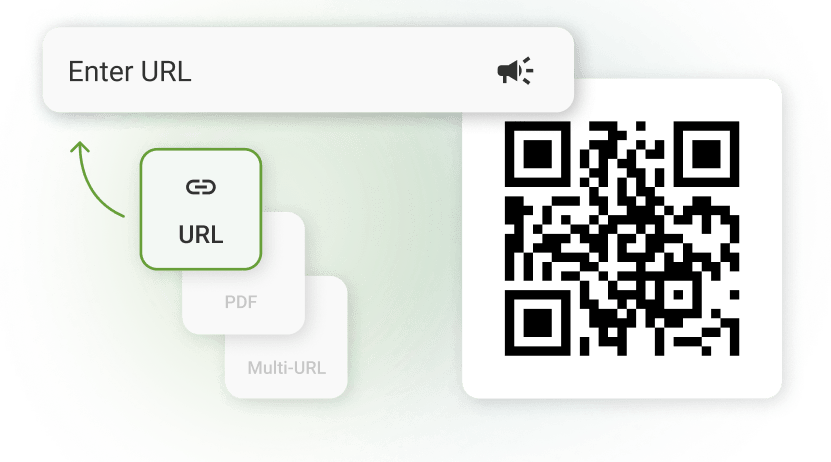
Step 4: Connect it to The QR Code Generator (TQRCG)
Now comes the fun part: making your photo wall interactive.
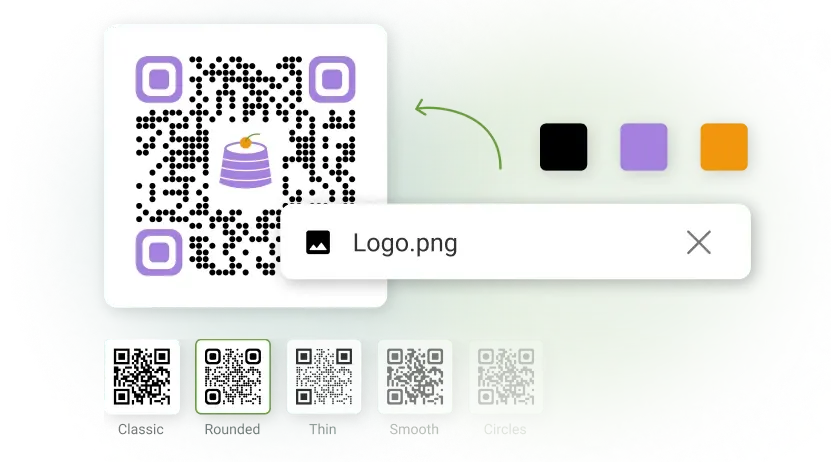
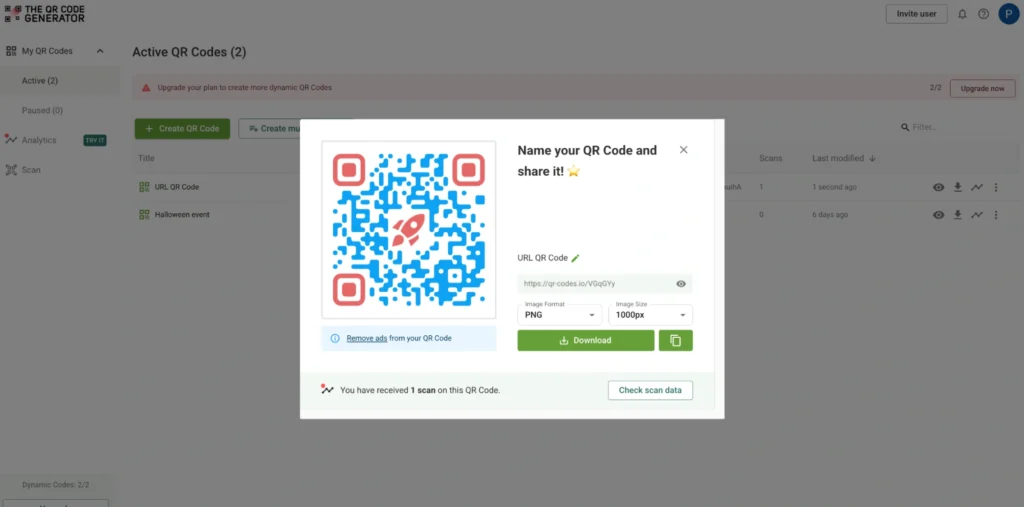
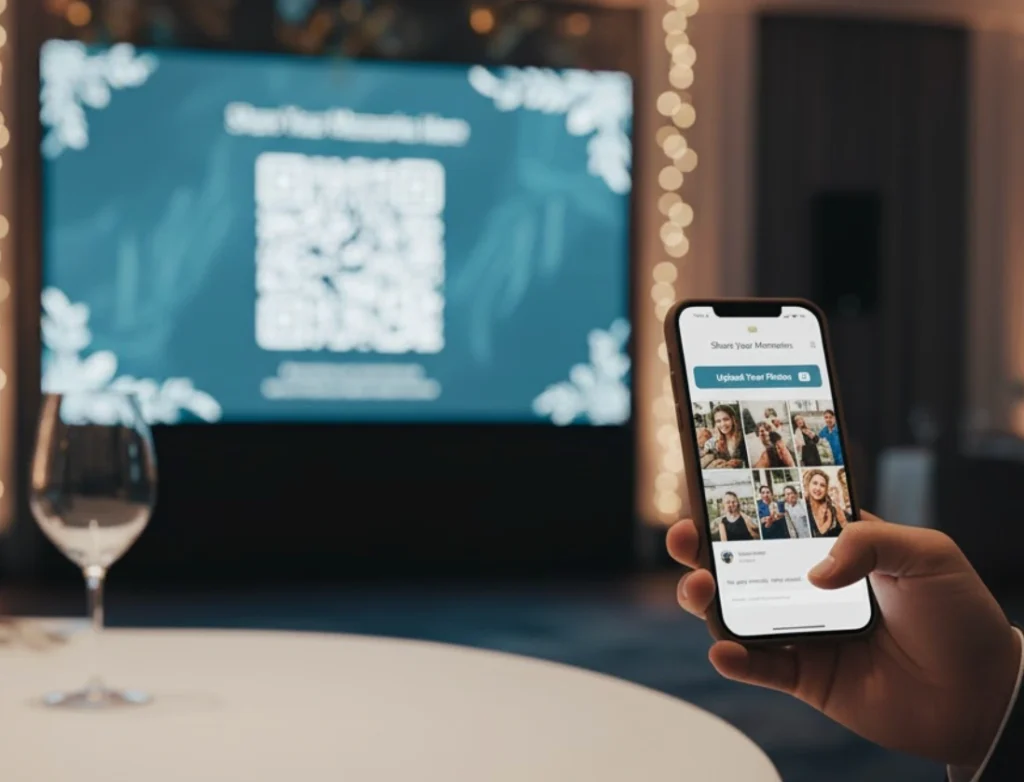
Head over to The QR Code Generator (TQRCG) and create a new URL QR Code. Paste your Google Photos album link in the destination field. Then, customize your QR Code so it’s unmistakably yours:
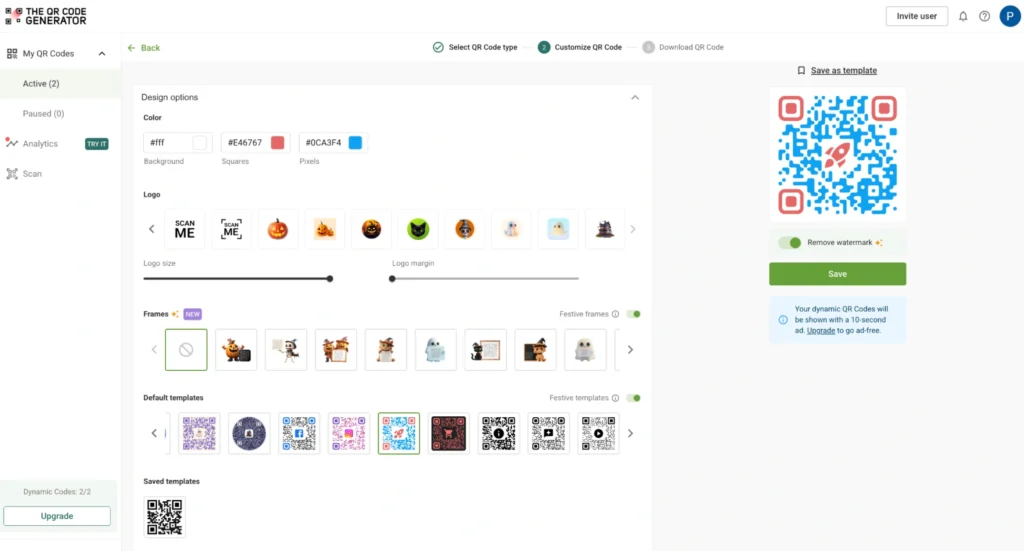
- Add your event logo, theme colors, and a simple call-to-action like “Scan to Share Your Photos!”
- Choose a dynamic QR Code (free forever if you sign in) if you want the flexibility to change the link later (for instance, switch from the pre-wedding album to the main event gallery).
- Save your design and download it in PNG or SVG format, depending on whether it’s for print or display.
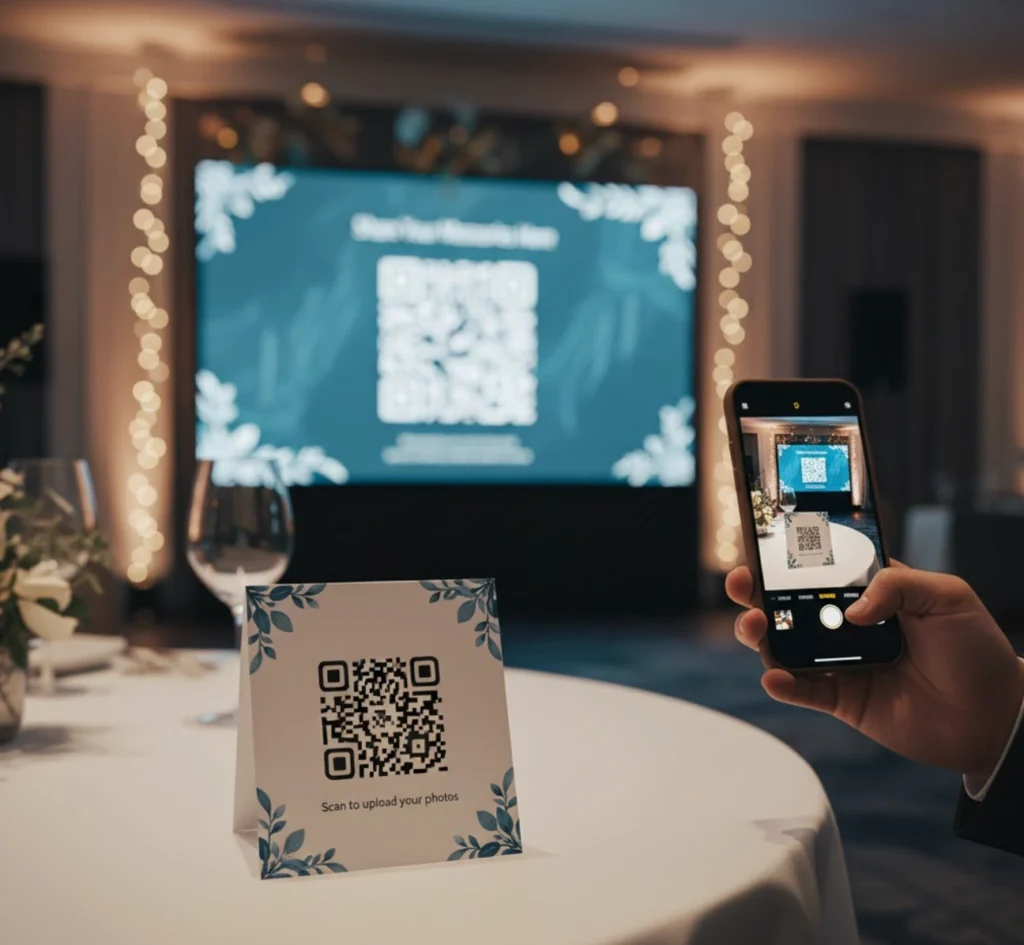
Step 5: Plan your QR Code placement and signage
Now that your QR Code is ready, consider where guests will notice it.
Print a few different versions:
- One for your welcome signage or registration desk
- Small ones for table cards, programs, or gift tables
- A large version for your projector slides or digital displays
Each should include a clear CTA like “Scan to Add Your Photo Now!” and a small visual cue (like a phone icon) so guests instantly understand what to do.
💡 Pro tip: Test if your QR Code is working by standing 5–8 feet away. If your phone can scan it easily from that distance, it’s event-ready.
Step 6: Test the complete workflow
Never skip this part. Testing ensures there are no surprises when the event starts.
Try the entire flow from start to finish:
- Open the RSVP or invitation where the QR Code will appear.
- Scan it using both iPhone and Android devices to make sure it loads smoothly.
- Upload a few test photos from your mobile and check that they appear correctly in the Google Photos album.
- Test under different Wi-Fi strengths, as events often have patchy connectivity.
- Finally, review how the photos appear on the live display screen (if you’re using one).
If you’re moderating uploads, make sure the approval queue updates properly before your album refreshes publicly.
Step 7: Go live on event day
You’re all set! During the event, keep the TQRCG dashboard and your Google Photos album open. Monitor new uploads in real time to catch any errors or duplicates.
If you’re using a live photo wall, refresh the browser periodically (or set it to auto-refresh). Ensure your signage is visible in high-traffic areas.
By the end of the event, you’ll have a living photo archive contributed by your guests, and the entire experience runs seamlessly through one QR Code-enabled workflow.
Best practices for creating QR Codes to share event photos
From the placement of your QR Codes to the moderation process, every element affects how people contribute and interact. You want your gallery to feel seamless, as if it’s magically updating in real time, while giving you full control over content and presentation.
Here are all the pieces to put together:
1. Make your QR Code impossible to miss
Place QR Codes strategically on your event invitations, welcome signage, table cards, or presentation slides. The key is visibility; you want your guests to notice them immediately.
Add a clear call-to-action like “Scan to upload your photos” or “Share your memories here.” Think of these QR Codes as digital guestbooks scattered throughout your venue, inviting everyone to contribute their unique perspective of your special day.
To make participation even more fun, transform photo sharing into an experience. Announce a “Best Candid Moment” contest, give shoutouts to top contributors, or turn it into a scavenger hunt with prompts like “Capture the most creative group photo.” When guests know their photos could be featured or rewarded, they become active storytellers.
2. Ensure one tap and zero friction
When your guests scan the QR Code, they should be instantly transported to a mobile-friendly upload page without needing to download apps or create accounts.
They simply tap the upload button, select their favorite shots from the moment, add an optional caption, and hit submit. They can even browse through photos others have shared, creating a sense of community and shared experience.
You want fast, smooth uploads, even with varying connections. Compress images automatically by 40–60% while maintaining high quality, reducing upload times to just a few seconds. Test this beforehand across devices to avoid delays during the event.
3. Review uploads before making them live
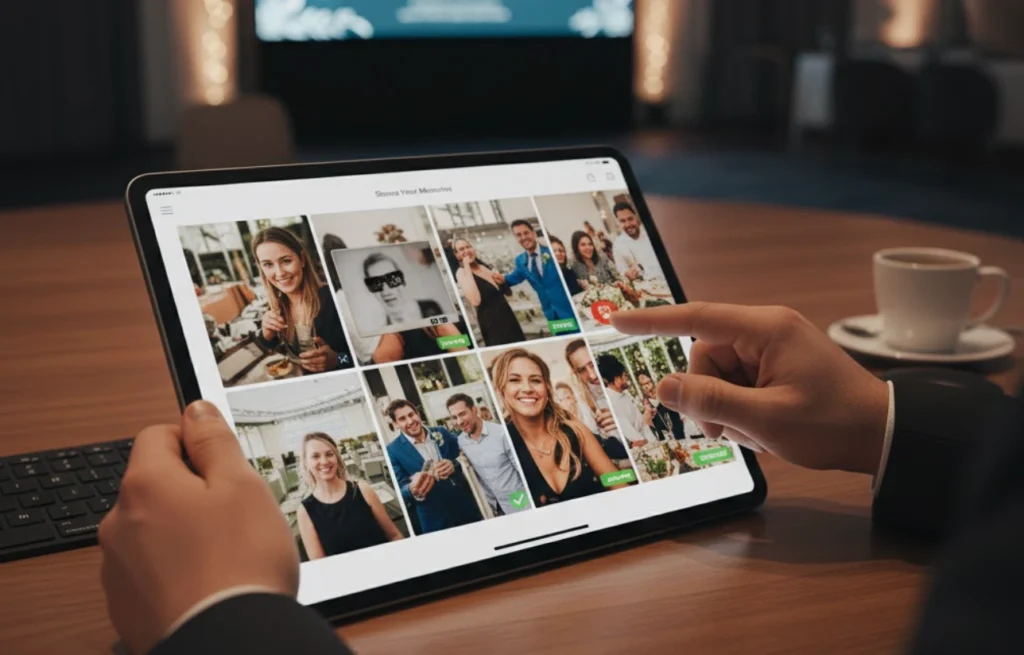
Before you let your event gallery go public, ensure you review the images uploaded by your guests. You can use built-in moderation tools to filter out any inappropriate content, remove duplicates, or simply curate the best shots that capture the essence of your event.
Tag or remove images based on relevance, duplicates, or content quality. Rename or categorize photos (e.g., “Ceremony,” “Reception,” “Behind the Scenes”) to make your final gallery easier to browse.
4. Create social proof and momentum
Display live counters on screens: “127 photos shared so far, add yours!” or highlight top contributors to trigger participation. This visible activity signals that uploading is the norm. A rotating “Featured Photographer of the Hour” whose recent uploads appear prominently can spark engagement.

5. Design for life after the event
Enable bulk downloads so you can grab every full-resolution photo immediately. Keep the gallery link active and share it widely: in thank-you emails, on social media, embedded on your event website.
This extended life keeps your event alive in people’s memories and creates ongoing engagement. Guests who forgot to upload during the event can still contribute afterward, and you’ll have past galleries to showcase how magical QR Code photo-sharing made previous celebrations.
6. Know what’s working (and what’s not)
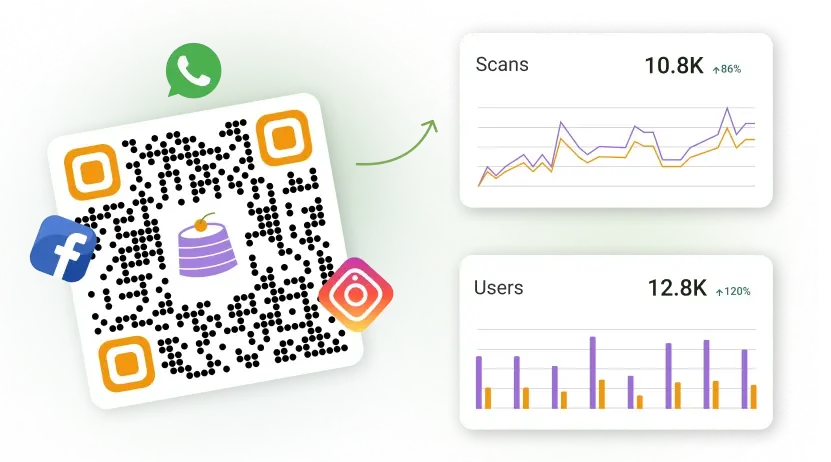
Curious about what worked? You’ll get insights into how many people scanned your QR Codes, how many photos were uploaded, and which guests were your most enthusiastic photographers.
You can even see which QR Code placements generated the most engagement. These metrics help you understand your guests’ behavior and optimize for your next event.

| The QR Code Generator (TQRCG) helps you understand how guests engaged with your QR Codes: Go to the Analytics tab on your dashboard. Here you’ll find scan data broken down by location, time, and device. Compare QR Code performance: If you used multiple QR Code placements (like table cards, signage, or the bar counter), view engagement by QR Code ID to see which spot generated the most uploads or by A/B testing QR Codes. Track participation: Check metrics like total scans vs. unique uploaders to measure how many guests contributed. Export engagement data: Download the analytics report as a CSV to include in your post-event review deck or share with your planning team. Apply insights for next time: For example, if most scans happened near the photo booth, plan extra QR Code placements there for your next event. |
What insights help you improve QR Code photo sharing at future events?
After your event, your QR Code analytics will become your playbook for the next time. The QR Code Generator shows which codes were scanned most, where engagement peaked, and how many guests actually uploaded photos.
By reviewing this data, you can:
- Refine placement strategy: Focus on high-traffic areas and remove underperforming spots.
- Optimize engagement flow: Adjust prompts, design, or upload experience based on guest behavior.
- Plan smarter for next time: Use participation trends to forecast how many uploads or contributors to expect at your next event.
Here are the key metrics that will help you use your QR Code photo system as a learning tool:
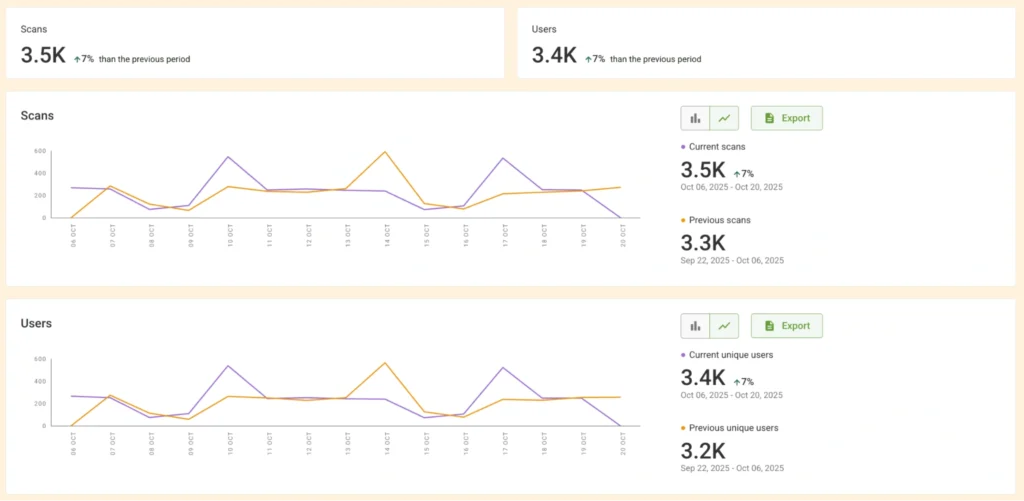
1. Total scans
This metric shows how often your QR Codes were scanned across all placements throughout your event. It’s your first indicator of visibility and guest interest. A high scan count means your codes were noticed, and curiosity was sparked, even if not everyone followed through with an upload.
2. Total users
This tells you how many unique individuals engaged with your photo-sharing system, separating one-time scanners from repeat contributors. You calculate your true participation rate by comparing the total number of users to your guest count.
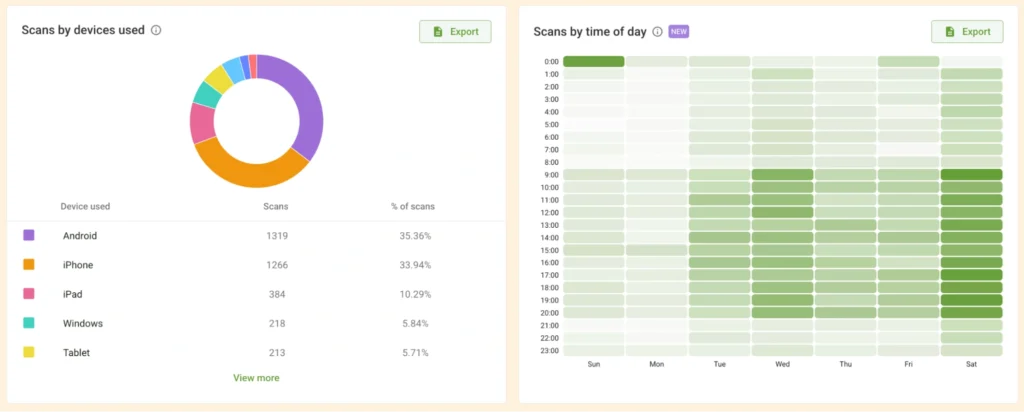
3. Scans by devices
Understanding whether guests used iPhones, Android devices, or tablets helps you optimize the mobile experience for your dominant user base. If 80% of scans come from iPhones, for instance, you’ll want to ensure your upload interface is perfectly optimized for iOS and test specifically on Safari browsers.
4. Scans by time of day
This reveals the rhythm of engagement throughout your event, showing you when guests are most actively scanning and uploading. Armed with this data, you can strategically time your announcements, contests, or incentives to coincide with natural engagement peaks.
Use these insights in your client pitches. Show prospective couples or corporate clients real data: “Our QR Code photo-sharing system averages 150+ uploads per event” or “Clients see 73% guest participation rates.”
This positions you as a data-driven professional who not only offers services but also optimizes experiences with QR Codes.
Set your event apart with QR Code photo shares
The difference between a forgettable event and an unforgettable one often comes down to the details and how well you capture the moments that matter. With event QR Codes, you’re not offering generic photo-sharing; you’re providing an optimized, data-informed experience that improves with every event you host.
Your dynamic QR Codes and analytics dashboard help you demonstrate ROI, justify premium pricing, and continuously refine what makes your events more engaging than anyone else’s.
Ready to elevate your next event with seamless photo-sharing? The QR Code Generator (TQRCG) makes it simple to create dynamic QR Codes with built-in analytics, customizable designs, and tracking capabilities that help you understand exactly what’s working.
Turn every guest into a photographer with QR Codes for event photos today!
Frequently asked questions
When guests scan the QR Code with their smartphone camera, they’re directed to a mobile-optimized upload page that works directly in their browser. No app store visits, no downloads, no sign-ups. They simply point, scan, and upload. This removes the biggest barrier to participation: asking people to install yet another app they’ll never use again.
Absolutely, and it is highly recommended for most events. You can set up a moderation queue where photos wait for your approval, or designate trusted friends or event coordinators as moderators. This gives you complete control over what appears in your live gallery or slideshow.
First, check with your venue ahead of time about Wi-Fi strength and consider upgrading the connection for your event if needed. Second, ensure your QR Code system supports offline queuing; some platforms allow guests to take photos that automatically upload once they reconnect to Wi-Fi or switch to cellular data. Third, encourage guests to use their mobile data if Wi-Fi is unreliable.
Enable the moderation feature mentioned earlier. This is your first line of defense. Additionally, many platforms offer upload limits per device or IP address, preventing any single guest from flooding your gallery. You can also add a simple upload form that requires guests to enter their name or a brief caption, which adds a layer of accountability and discourages anonymous spam.
Yes, and this is one of the most exciting features of QR Code photo-sharing! Connect a laptop or tablet to your projector or TV screens, open the gallery in full-screen slideshow mode, and watch as new photos automatically appear. You control the transition speed, whether to show captions, and the layout style.
Start by making your QR Codes unmissable. Use engaging language: instead of just “QR Code,” try “Snap & Share Your Favorite Moment!” or “Help Us Capture the Magic, Upload Your Photos!” Announce the photo-sharing feature during welcome speeches or toasts, and show the live gallery on screens so guests see their contributions matter.